
DIY Furniture Makeover: Transform Old Pieces into New Treasures
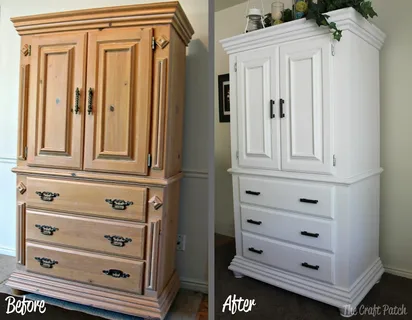
Looking for a budget-friendly way to refresh your home decor? A DIY furniture makeover might be the perfect solution. Instead of buying new, why not give your old furniture a second life? With a little creativity, elbow grease, and a few supplies, you can transform worn-out, outdated pieces into beautiful, functional treasures that suit your style. Here’s a guide to help you get started on your own furniture makeover journey.
1. Assess the Piece and Set a Goal
Before diving into any project, take the time to assess the furniture piece you want to transform. Is it solid wood that just needs a fresh coat of paint? Or is it a cheap particle board piece that needs significant repair? Understanding the material and structure of the furniture will help guide your decision on what type of makeover it needs.
Set your goal:
- Restoring functionality: Repairing broken parts and making the piece sturdy again.
- Aesthetic change: Giving the furniture a modern update or a completely new look.
- Customization: Adding personal touches that make it uniquely yours.
2. Sand and Prep the Furniture
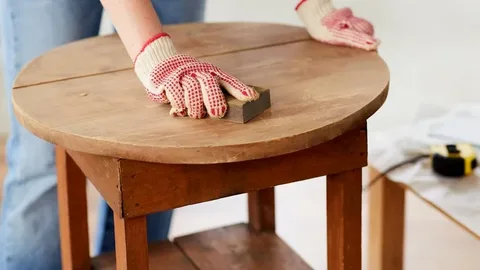
Preparation is key to a successful furniture makeover. If you’re working with wood, start by sanding the piece to remove any old finishes, paint, or stains. This step is crucial for ensuring the new paint or stain adheres well to the surface. Use medium-grit sandpaper for the initial sanding and finish with a fine-grit paper for a smooth surface.
Pro Tip: If you’re working with a painted surface, use a paint stripper to make the process easier.
3. Repair and Reinforce
Furniture that’s seen better days might need some TLC before it can shine again. Check for broken legs, loose joints, or damaged hardware. Use wood glue to fix loose joints and clamps to hold them in place while drying. For broken or missing parts, such as drawer pulls or knobs, you can replace them with new hardware, or even get creative with unique vintage finds.
Common repairs:
- Reinforcing legs with screws or brackets
- Fixing cracks or chips in the wood with wood filler
- Replacing old or worn-out hardware
4. Pick Your New Finish
The finish you choose for your furniture makeover will dramatically change its appearance. Here are a few options to consider:
Paint: A fresh coat of paint is one of the easiest ways to update furniture. Chalk paint, milk paint, and spray paint all offer different finishes and textures. Chalk paint is particularly popular for giving furniture a rustic or vintage look.
Stain: If you love the natural look of wood, a good wood stain can bring out the beauty of the grain while adding depth and richness to the piece. Use a gel stain for an easy application that provides a uniform finish.
Decoupage or Fabric: For a more creative approach, you can decoupage furniture with patterned paper or fabric to give it a whole new personality. This is especially great for table tops or drawer fronts.
5. Add Decorative Touches
Once the main finish is applied, it’s time to add those little touches that will make your piece truly unique. Decorative hardware, like stylish knobs, pulls, or handles, can elevate the look of any piece. If you’re feeling creative, consider adding stenciled designs, upholstery fabric, or even a distressed look for a shabby-chic vibe.
Ideas for decoration:
- Stenciling or freehand painting designs
- Upholstering the seat of a chair or bench in a bold, trendy fabric
- Adding vintage-style hardware for an antique effect
6. Seal and Protect
Once your furniture makeover is complete, it’s important to protect your hard work. Apply a protective topcoat or sealant to ensure that the finish holds up over time. A polyurethane finish will provide durability and water resistance, especially if your piece will be used frequently.
For painted pieces, a wax or polycrylic sealer can give a smooth, protective finish without compromising the color.
7. Reassemble and Enjoy
Once everything is dry and sealed, reassemble any parts that were removed, such as drawers or hardware. Place your newly transformed furniture in its intended spot and admire your handiwork!
Final Thoughts
A DIY furniture makeover is a rewarding and cost-effective way to breathe new life into old furniture. Whether you’re refreshing a tired dresser or turning an old chair into a statement piece, the possibilities are endless. With the right tools and a little creativity, you can transform forgotten pieces into stylish, functional treasures that fit perfectly into your home decor.